| I recently tried out Integral Design's Sil Shelter while
hiking in the sand dunes of Lake Michigan. Here are some pics and more information. |
 |
| This is the Sil Shelter, pitched and completely closed up. Note that
there are a couple inches left open around the bottom. This is done to permit air to
circulate inside and reduce condensation. Since the temps dropped to below freezing at
night, conditions were perfect to create condensation and in fact, some condensation did
occur. A very light film formed on the inside surface of the tarp. But no water dripped
and neither my down bag nor anything else under the tarp got wet. To pitch the tarp so
that you have space at the bottom, you have to add some short loops of rope to the tie
loops, effectively increasing the length of the loops. |
 |
| Here's another view of the tarp at a different angle. Notice how the
front wings overlap. |
 |
| I found that this overlap could be improved by adding a tie down rope to
the outer wing. If you look carefully, you can see that the loop is attached to a short
wooden stake. The stake is driven in at an angle. Once inside the tarp, you can slip the
loop over the stake by reaching under the wing, grabbing the rope and slipping it over the
stake. |
 |
| The same is true for closing the tarp. A short, wooden stake is driven
into the ground at an angle. Once inside the tarp, you can grab the loop of the outermost
wing by reaching under the edge of the other wing. You then slip the loop over the stake,
and the tarp is completely closed. The easiest way to to this is to cant the center pole,
adding slack to the tarp, and then slip the loop over the stake. At this point, you can
then attach the wing guy rope to the other wooden stake. Then you can return the center
pole to its original position and the tarp will be very taut. Supposedly, the Achilles'
heel of this tarp is that it can leak at the top where the wings overlap. I actually think
this part of the tarp could have been designed better for overlapping. It did not rain on
this trip so I can't report how well the tarp does in the rain. But from what I've read on
the net, this is not usually a problem, but can be.
Note in this pic, you can see the loops that I added to extend the length of the loops
along the edge. Also note the various ways you can guy the tarp out. The center guy is
attached to a tree as is the rear guy on the right. The left rear guy is wrapped around a
tall stick and then staked to the ground. |
 |
| A forked stick works well for this. Make one turn around one of the forks
and then stake the rope. The stick doesn't not have to be driven into the ground. I've
used this technique many times with a tarp and it's very effective. It holds well, even in
strong wind. I use Kelty Triptease Lightline for guying because it's light, tough, and
I've not found it to stretch when wet. |
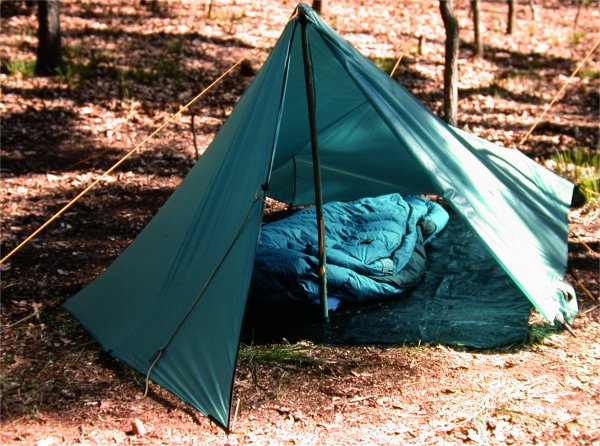 |
| The tarp is held up by a single pole. You can use a hiking stick for this
or cut a pole. I found the interior to be quite roomy for one person but I personally
would go with a 10x10 tarp for two people. Note the rope attached to the wing. This rope
was used to stake down the inside wing and will pass to the right and down and be staked. How
you stake the tarp out is a matter of preference. Six stakes, I think, is the suggested
minimum. Part of it depends on how level the ground is and the other depends on what you
feel comfortable with. There is plenty of room for experimentation.
This is the true color of the tarp. This picture was taken with Kodachrome. The pics
where the tarp appears blue were taken with Fugichrome Provia. Fugichrome Sensia does not
show such a major color shift. The people at the photo shop that recommended Prove to me
for its exceptionally tight grain were really surprised at the color shift. |
 |
| I replaced the original stuff stack with a slightly larger sack, to make
it easier to stuff. I never fold a tarp or tent but always stuff it. I think it reduces
"memory" lines in them and they will last longer. I believe the tarp weighs
around one pound with the guy lines attached but I will have to check that for sure. Note
the rubber cane ends. One is larger than the other. I attach these to the pole that I cut
that holds the tarp up. The bottom one, especially, keeps the pole from sliding around on
the ground cloth. This was never a problem. Everything taken together comes in well under
2 lbs. |
 |
| Overall, I have to rate the Sil Shelter very highly. Because of its
ability to be more enclosed than a regular tarp, it provides extra warmth and protection
from wind-blown rain when compared to a regular tarp. I slept very warmly in this tarp.
It's a little more complicated to set up than a regular tarp but once you've done it a few
times, setup is a snap. I first stake it out, then use my Sherlock hiking staff to support
the center. I then guy it out. After that, I remove the hiking staff and use it as a
template to cut a center pole. This is important, because the length of the center pole
can vary, depending on exactly how you pitched the tarp, and the evenness of the terrain.
I only do this when I am using my campsite as a base camp and plan to do more casual
hiking the rest of the time. Otherwise, I just use the hiking staff for support. |