Custom too Expensive?
How about making your own?
By Glen Lewis
Do you like knives? Do you like to use them? Do you like them to look good and perfectly fit your hand? Are you pleased with exotic woods with wild colorful burls bursting with features? Have you found a good knife but wanted it in carbon steel instead of stainless or maybe stainless instead of carbon, loved a knife but wanted a blade length two inches more or maybe two inches less? Like most of us, you have found that the handle sometimes just does not fit your hand well. Maybe you have found your dream knife that has all those perfect things but it is simply out of bounds with your budget. It is beautiful with exotic wood, the perfect length blade for your needs but the price tag is a staggering $300 and you only have $50 to spend on your obsession?
Warning: Obtaining a $300 knife with only $50 in your pocket can be addicting and you may come up with something that is absolutely priceless in terms of challenge, achievement and beauty. Bottom line: Anyone can accomplish this goal. You bring the desire and a few hand tools, and you will experience the pride of craftsmanship that a little investment of time, sweat and mental exercise will return to you. If you have access to a hand drill, a hacksaw, a set of files, a couple of wood rasps, some clamps and some sand paper then you can do this thing. A good vice, a cheap belt grinder and an inexpensive drill press are the ultimate. They make the work go faster but you can get by without them. However before we drift off into those deep blue waters lets splash back over here to the most important thing; imagination. You need a pad of paper, a pencil and a plan.
In the beginning keep your plan simple with clean lines and few bell or whistles. The fancy stuff can come with time but you will be happier with a good, no nonsense design for your first few masterpieces. Remember there is a learning curve and you are now on the steep side. Let that idea guide your hands to a carefully thought out, precise economy of design. Spatial perception is your biggest challenge. Hatching your original plan is the start to a beautiful, strong, personal blade. Then one must execute the plan and follow it through to the end.
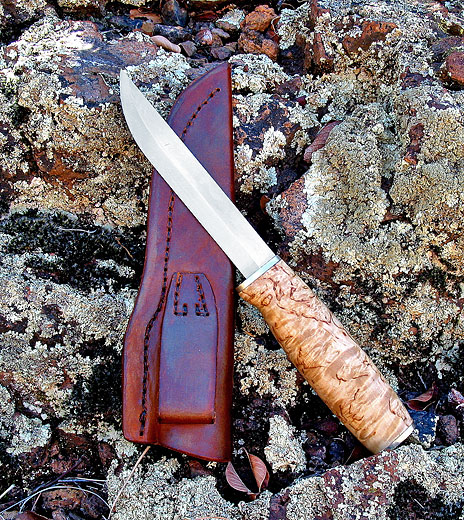
This short course will deal with Scandinavian style knives. I have found them to be one of the ultimate using style blades. They combine both high functionality and incredible beauty. The stick tang leaves you a huge array of options when choosing your handle shape. These aren’t pry bars, but the stick tang is very strong and they are some of the sharpest and most useful blades you will ever have the pleasure of holding in your hand. My favorite is the Finnish puukko. The Finnish knife is more than 1000 years old and down through the centuries it has been refined as the puukko we know today. There are many little variations on this theme that you can choose for your own design but in the beginning as I said previously, we are going to keep it simple and clean. In any case simplicity is the ultimate ideal embodied in a design that insured 1000 years of survival in a harsh unforgiving landscape. This is not a climate that suffered fools nor does it still. When these hardy adventurers first set out across the arctic tundra or sailed the ocean in search of strange, new lands, the sword may have been their weapon of choice but it was the Nordic style knife that was their hard use utility blade. It was their most important tool and they used it far more often than they did those beautiful swords. It butchered game, cleaned fish, fashioned wooden parts for the boat and tools or accessories for the hut. It was the indispensable tool.
To start your design, you
need to decide how you will use your knife most of the time. A long blade
can be good for butchering, slicing bread, light chopping and other game
chores or food preparation. A short blade is good for carving and woodwork.
A medium blade is considered a good all-rounder. For this project we are
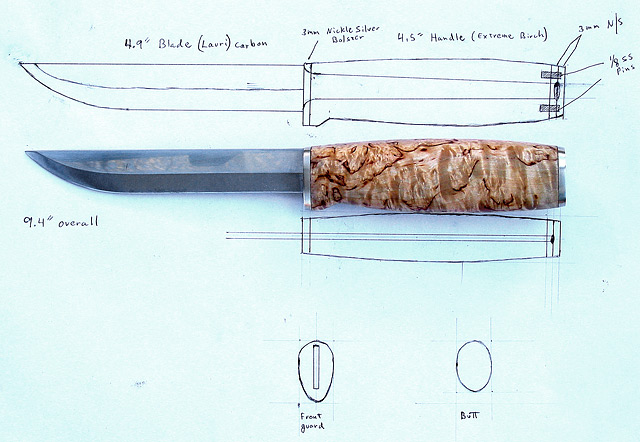
going to use a 5” blade which is on the longer side of the spectrum. Now a
handle needs to be designed. If you have a handle design that fits your hand
well, measure it well. How long do you like a handle? How wide and how high
should the cross section be? Start putting all of this information down on
paper. Make a side view and a top view. Take your time. Make a few drawings.
A good design at this point will insure a good knife when all is said and
done. In general, I like the Nordic style handle but always wished for a
small finger indentation just before the front bolster so I incorporated it
into my drawing. Decide on your bolster material and add it and it’s
thickness into your drawing. For a very simple knife you do not even need a
bolster but it does add strength, durability and good looks. Overlay the
blade on your drawing and trace it and the tang where you want them to end
up.
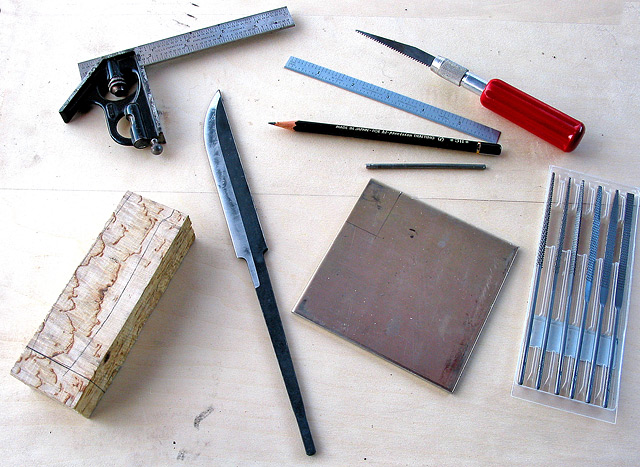
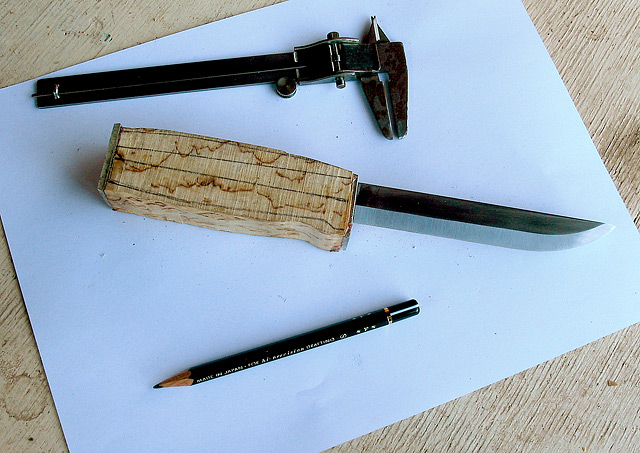
Once you have drawn up plans that you are happy with, lay out all of your
materials. For this knife we have a Lauri carbon steel five inch blade, a
block of curly birch and a small sheet of nickel-silver. The blade is $7,
the wood is the ultimate extreme curly birch for $11, you can go cheaper on
this but the extreme is extremely beautiful, and a 6x6” sheet of 3mm
nickel-silver for $6.50.
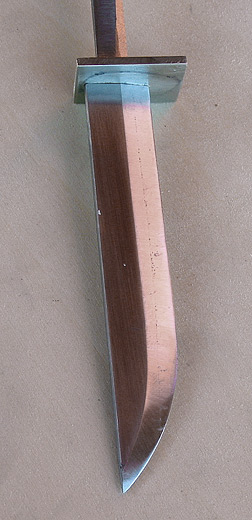
The first step is to finish the blade. Some blades are ready to go with
almost no finishing but this one still has the heat treat scale on it and
needs work. I start with 150 grit ebony paper and lay it on a flat board.
Then I lay the blade on it flat and start moving it black and forth until it
is sanded down uniformly. I like this method as it keeps the grind lines
very sharp. Progress on to 220, 320, 400 and finally 600 grit. When you get
to the 600 grit, only take the blade over it for a pass or two if you want
that satin finish. Otherwise the paper will fill up and you will begin to
polish it to a mirror finish.
 If you are going to use a bolster then making it is the next step. This is
the hardest piece to make. It must fit tight with no play up and down or
side to side. Eyeballing and measuring will get you a good plan to draw on
the nickel-silver piece you will use. Once you decide what shape it will
take to slide down the tang and fit tight up against the blade draw it on
the piece and mark the center of the slot with a punch. If it is long enough
for two drill holes then mark them both. Keep in mind the width of your
drill bit. Select a drill bit that will almost touch the edges of the drawn
slot. Drill the holes and start work with a set of needle files. Slowly work
your slot to shape and keep sliding it farther down the tang until it fits
against the blade. Spatial perception is your biggest friend when you are
doing this step. My first one took about five hours to measure, draw and
shape. The rest of the knife will not take you a whole lot more than this
one step. Do it carefully so it fits well.
If you are going to use a bolster then making it is the next step. This is
the hardest piece to make. It must fit tight with no play up and down or
side to side. Eyeballing and measuring will get you a good plan to draw on
the nickel-silver piece you will use. Once you decide what shape it will
take to slide down the tang and fit tight up against the blade draw it on
the piece and mark the center of the slot with a punch. If it is long enough
for two drill holes then mark them both. Keep in mind the width of your
drill bit. Select a drill bit that will almost touch the edges of the drawn
slot. Drill the holes and start work with a set of needle files. Slowly work
your slot to shape and keep sliding it farther down the tang until it fits
against the blade. Spatial perception is your biggest friend when you are
doing this step. My first one took about five hours to measure, draw and
shape. The rest of the knife will not take you a whole lot more than this
one step. Do it carefully so it fits well.
Now copy your drawing on a copy machine. Save the original and cut out the
patterns on the copy. Lay the pattern on one side of your block of wood and
trace it. Use a small square to line up the marks on the opposite side of
the wooden block and then trace it on that side as well. Do the same thing
to the top view and the bottom. Now lay your blade on the wood with the
bolster on and draw in your tang path on both sides as well as the top and
bottom. This is important so the blade will travel through properly and exit
straight on both planes. Find the exact center point where the tang enters
the wood and exits it. Mark them and punch a guide mark for your drill bit.
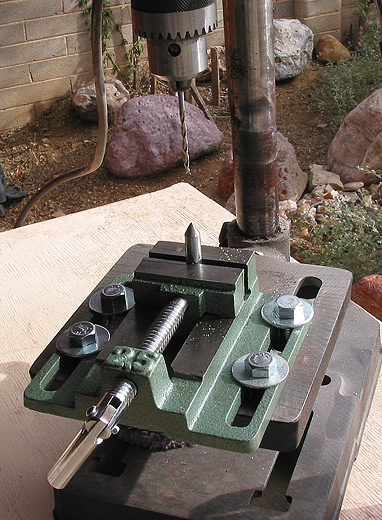 The drilling is easiest and most accurately done with a drill press but if
you are very careful, you can line it up with a hand drill. This is best
done with a short bit as a longer bit can flex in the burls and bend off
track. You will have to drill the front and then the back of the handle
making the two holes meet. If you have access to a drill press, make a
“bottom pin” which is a sharp pin held in place by the drill press vice as
illustrated. Line the drill bit up perfectly so it would touch the point on
the bottom pin if lowered all the way to it. Place the punch marked tang
entry point on the bottom pin and lower the drill bit into exit punch mark.
Drill slowly and carefully. Turn the wood handle over and repeat on the
other end meeting perfectly in the middle every time.
The drilling is easiest and most accurately done with a drill press but if
you are very careful, you can line it up with a hand drill. This is best
done with a short bit as a longer bit can flex in the burls and bend off
track. You will have to drill the front and then the back of the handle
making the two holes meet. If you have access to a drill press, make a
“bottom pin” which is a sharp pin held in place by the drill press vice as
illustrated. Line the drill bit up perfectly so it would touch the point on
the bottom pin if lowered all the way to it. Place the punch marked tang
entry point on the bottom pin and lower the drill bit into exit punch mark.
Drill slowly and carefully. Turn the wood handle over and repeat on the
other end meeting perfectly in the middle every time.
Now you have your guide hole that the tang will sit in. Take a tiny wood
rasp and start shaping the hole into the shape of the tang. Make sure the
front fits your tang perfectly with not play. It should be a tight fit. Once
this is accomplished, fit everything together and shape your rear bolster. I
mark the tang where it exits the pommel end and then round it off with a
file or belt grinder very carefully and measure for the closest drill bit
size. You want a tight fit here. Drill the hole at the punch mark you have
made in the rear bolster and slip it down over the tang. If everything fits
precisely, you are ready for final assembly.
Saw or grind off the exposed tang till there is about 1mm or so sticking
out. Take the entire assembly apart and clean the tang and bolsters with
acetone. Mix up some long set epoxy. You do not want quick set for this
project. Mix up some JB Weld for the bolster blade junction. Slow set will
give you time to assemble the knife and peen the tang down over the rear
bolster? Place the blade in a pair of pine blocks and tighten it down very
securely in a strong vice. Put JB weld on the joint between the blade and
the bolster. Set the bolster in place and make sure the joint is full of JB
Weld. Put as much epoxy in the wood handle as possible. Use a narrow piece
of wood to get it deep. It will run down in by gravity. Put the rest of the
epoxy on the bolsters and the tang and push the parts together. Epoxy should
squeeze out.
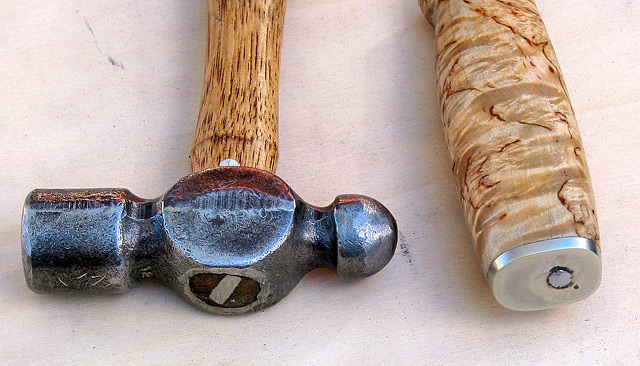
Take a small ball peen hammer and slowly peen the tang over the
bolster. This can take some time. Don’t jackhammer it. Do it slowly and
deliberately. Finally it will mushroom and swell, pulling the entire knife
together firmly. You will know when it is peened properly when the rear
bolster will not move. It is nailed in place.
Now go camping for a day or two. Let the epoxy fully set.
The handle is now ready to be shaped. You can use a course file, course
sandpaper or if you have it, a belt grinder. Start by getting the exact
shape of the sides ground down to the outline. At this point lay your top
plans over the top and bottom and retrace where you ground them off. Now
take them down till you outline that dimension. You now have the exact shape
of the handle ground out of the wood but it is Square in cross section.
Start taking the corners down to a rounder shape. Round it down till the
handle becomes comfortable. It will slowly take shape. This is the really
fun part. All the difficult problems are over at this point and you are in
the final customization. When you get the handle to where you want it and it
has that perfect feel, you are ready to do the final sanding. When I was at
this point, I wondered to myself why I had spent so much money on that
extreme curly birch. It looked fairly plain but as I took it down grit by
grit is started to pop out. The depth of the grain, pattern and features
came out of the wood like magic. Start with 80 grit and progress on to 150,
220, 320, 400 and finally 600 grit taking care to remove all the scratches
from the previous grit before going on to the next. When it is glass smooth
you are ready for the finish. I use tung oil. Follow the instructions and
let it dry overnight.
You are now ready to put an edge on your masterpiece. You can sharpen it the
normal way you always sharpen a knife or you can do the Scandinavian way.
The blade is designed very thin for a high cutting efficiency. The bevel
goes halfway or more to the spine. There is a large flat area to keep
strength in that thin blade but the real magic is the fact that the primary
bevel goes all the way to the edge. There is no secondary bevel in Scandi
style sharpening. I sharpen mine by laying sandpaper on a very flat board
and holding the blade down by the bevel, pushing it across the paper. Start
with 80 and progress grit by grit to 600 again. Make sure to get all the
scratches from the previous grade ground out before going on. When you
finish up with the 600 grit you will be holding the sharpest knife you have
ever held. Do not touch anything with it that you do not want cut. This is
the edge that the Finns are so “finicky” over. They demand a wicked sharp
blade. Use it in your kitchen, feather up some sticks for fire building, use
it for cleaning fish or making a sandwich. You now have the perfect utility
knife for home, camp, hiking, hunting or fishing and it is custom made for
your hands and eyes.
Counting the blade, the wood and ¼ of the nickel-silver sheet we have spent
a grand total of $20 and we have a knife that is priceless. You will use it
for everything. You will carry it with pride. You are now hooked in the
highly addictive world of building Scandinavian style knives. The
possibilities are endless.
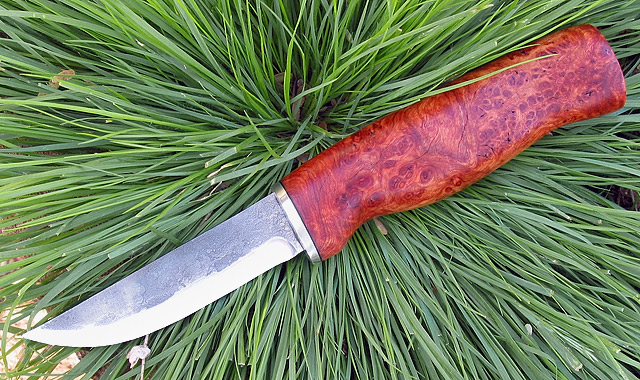
Here is my second knife, a hand forged 3” Vickstrom blade, Maka wood from
Thailand and hammer finished nickel-silver bolsters. I think of it as Arctic
steel set in Tropical wood.
I obtained all of these materials from Dennis Holmbacka at Brisa. He is
based in Jakobstad, Finland on the Gulf of Bothnia, just north of the Baltic
Sea. The easiest way to get there is by computer. His website is
http://www.brisa.fi/start3.html.
He answers all of his emails promptly. The prices are in Euros. One Euro is
about one dollar. He has a currency converter on his site so you can check
to exchange rate.
©2003 Glen Lewis