Sheath It!
By Glen Lewis
Sheaths are wonderful things. They keep the blade accessible, protect the edge from nicks and damage and some knives actually come with a well designed, high quality, good looking sheath. Some don’t.
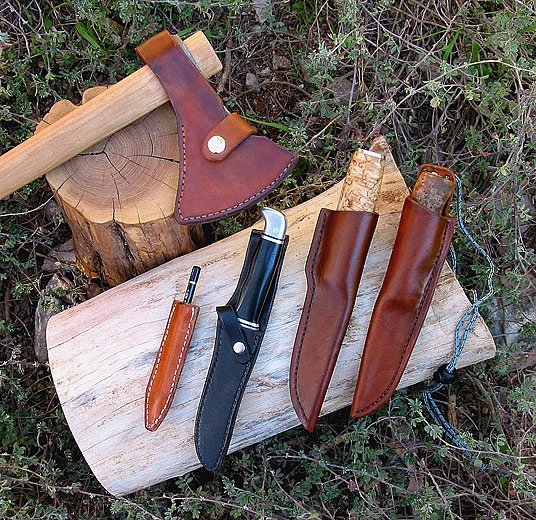
Have you ever wished for a better sheath than the one which came with your favorite knife? Have you had your knife for many years and over the countless trips in the wild your sheath has become too worn to safely carry your blade with confidence? You have several choices. You can have a Kydex sheath made for your knife and that is an excellent option. You can have an expensive custom leather sheath made that will carry your fine blade with an elegance and style or you can make your own leather sheath.
Leather is my favorite sheathing material. I just like the way it looks and they way it does not scratch the finish with repeated sheathings. It does not rattle. You can choose your color and your style sheath as well. Wood scales, stacked leather or stag handles seem to beg for the look and feel of leather. Note: While a leather sheath does a very good job protecting your blade from damage, it is not always a solution when trying to protect you from your own blade. No sheath is. Careful carry is the key to safety. If you slip and fall on a sheathed knife, the blade may come through the sheath and cause bodily harm. Make sure the knife is carried where it won’t do any damage should a slip occur.
We will make a leather pouch sheath in this article. I have developed a method from taking some traditional steps and modifying the process to work best for someone who rarely makes a sheath but wants the very best.
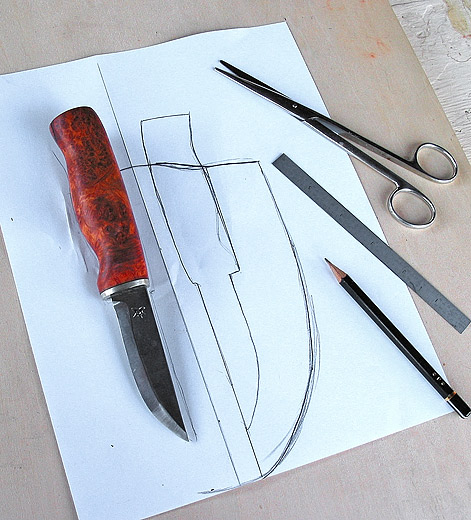 Take your knife and lay it
on a sheet of paper. Trace an outline around it with the spine in the
center and the edge toward the outside. Fold the paper over the knife and
mark the center of the back of the handle as well as the center of the
front of the handle. This will show you how much material it will take to
wrap around the entire handle. I always add more than I will need for the
welt so I don’t come up short. You cannot add more later on and until you
become more familiar with the whole process, this will assure you of a
good well designed final product. Add about an inch to the outside edge of
your outline. Fold the paper in half and cut it out. You will have a shape
that looks sort of like a shield. Lay that down on another piece of paper
and trace it once more and cut that out. Now cut out the shape on the
first paper that includes the edge of the knife and that side of the
handle to the outside margin of the shield. This is your welt. You must
take into account the shape of your handle. If it dips in near the guard,
you must leave the welt straight and not curved into that finger
indentation so the knife can slide down into the sheath. It should be
tight around the fattest part of the handle. Decide how wide a belt loop
you need and add about another inch on both ends for stitching. I
generally allow for a two inch belt and make the loop an inch wide. You
may make it as wide and long as you want. Cut that out as well.
Take your knife and lay it
on a sheet of paper. Trace an outline around it with the spine in the
center and the edge toward the outside. Fold the paper over the knife and
mark the center of the back of the handle as well as the center of the
front of the handle. This will show you how much material it will take to
wrap around the entire handle. I always add more than I will need for the
welt so I don’t come up short. You cannot add more later on and until you
become more familiar with the whole process, this will assure you of a
good well designed final product. Add about an inch to the outside edge of
your outline. Fold the paper in half and cut it out. You will have a shape
that looks sort of like a shield. Lay that down on another piece of paper
and trace it once more and cut that out. Now cut out the shape on the
first paper that includes the edge of the knife and that side of the
handle to the outside margin of the shield. This is your welt. You must
take into account the shape of your handle. If it dips in near the guard,
you must leave the welt straight and not curved into that finger
indentation so the knife can slide down into the sheath. It should be
tight around the fattest part of the handle. Decide how wide a belt loop
you need and add about another inch on both ends for stitching. I
generally allow for a two inch belt and make the loop an inch wide. You
may make it as wide and long as you want. Cut that out as well.
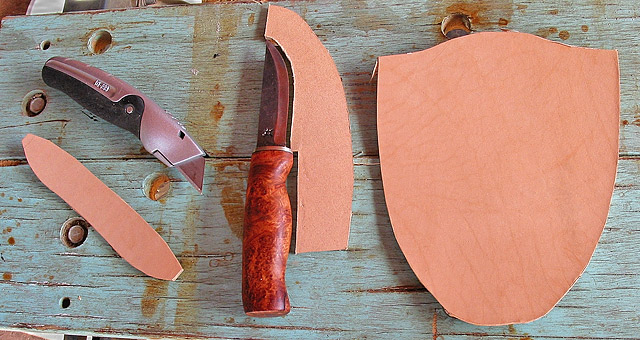
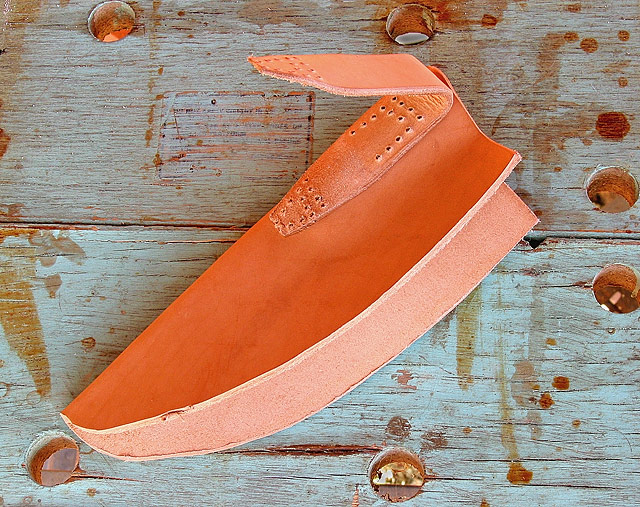
You need a piece of good leather. 8/9 ounce vegetable
tanned leather is what many sheath makers use for a good heavy leather
knife sheath. Vegetable tanned leather can be molded when wet and that is
what we will do for our pouch sheath. Take your pattern down to your local
leather supply and overlay it on the smaller pieces until you find one
that accepts the whole pattern. Trace the pattern on the leather with a
pencil and carefully cut it out with a sturdy craft knife. A sharp blade
is a must. Be careful not to cut into the pattern or yourself. Once the
pieces are cut out, make sure the welt fits the contours of the blade and
line up with the handle.
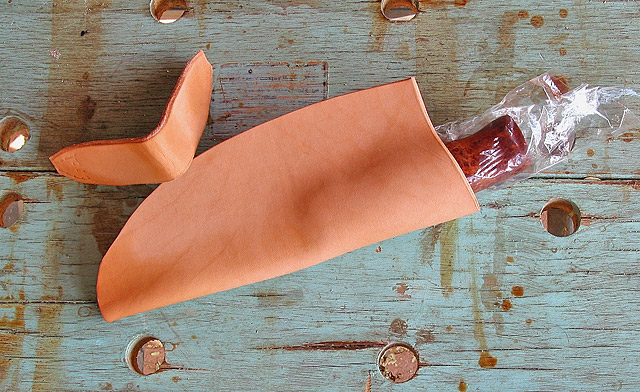
Now wet the leather piece that will form the main sheath.
Be very careful with the leather at this point. Any marks put on the wet
leather will be permanent. You may burnish the top of the sheath where the
throat will be at this point. First use an edge beveling tool to cut the
square edges down, then round them off with a plastic edge slicker. Both
of these tools can be purchased from The Leather Factory or Tandy Leather.
Next, slowly form the wet leather around the knife which is wrapped in a
thin layer of plastic wrap. Once you are satisfied with the way the leather is formed
around the knife, let it naturally dry.
Take your cutout for the belt loop and wet it in the middle. Bend it in half and skiv down the ends. This is done with a skiving tool that shaves down the leather thickness gradually. I found my skiving tool at The Leather Factory for $10. Tandy has the same tools. Once this is complete, lay it on the formed sheath where you want it to end up. Mark it with a pencil lightly so you can line it up again quickly. Once both pieces are dry, apply Barge cement on both surfaces to be joined. Let the cement dry for about ten minutes and press them together. Let this bond cure for about half an hour. Dampen your leather belt loop on the inside where your first stitches will be sewn. These first stitches will be placed near the top of the loop to hold it fast. Now take an overstitch spacer which is a tool with a wheel having a star like profile and can be found at The Leather Factory for $8. The projections on the wheel will mark your stitch points and space them evenly. Now let the leather dry once more. Once dry, drill the marks where the stitches will go with a 5/64th” drill bit.
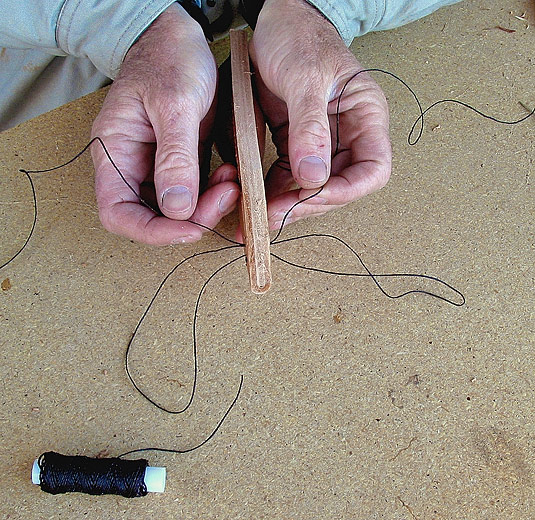
Generally the rule is to measure off at least fives times the amount of waxed thread as the length of the stitch line. You need two stitching needles and each is threaded on opposite ends of the thread. The stiff waxed thread will hold well with just an inch or so folded over through the eye of the needle. Place one needle through the bottom stitch hole and pull it through till thread is evenly apportioned to each side. Now push the needle through the next stitch hole. The opposite needle with go through the same hole from the opposite side. Pull the threads tight. Continue the process until you have reached the last stitch hole and then back stitch two holes and take the outside thread and extra time to an inside stitch hole. Now you will have the threads on the same side of the sheath. Cut them off and melt them with a flame. They will melt into their stitch holes. Do not allow them to catch on fire. Just melt them so they shrink. Slightly dampen the stitch lines and go over it with the overstitch tool. This will lay the stitch line below the surface of the leather and give it a professional machine stitched look. Now fold the loop over and repeat the above steps to stitch the belt loop closed.
Place the knife in the formed sheath and fit the welt to the knife. Remove the knife and mark the position of the welt on the inside of the sheath on both sides. Spread Barge cement on both of these surfaces inside the marked off area. Coat both sides of the welt with cement. Let these pieces sit for about ten minutes and carefully line them up and press them together. Let it cure for about 30 minutes. Take your welt pattern and line it up with the cemented welt. This will show you where the inside of the welt line is. Start at the throat of the sheath and carefully mark some points 3/16th” out from that line. Make these marks until you come to the squared off portion of the welt where the bolster meets the blade. Now start at the bottom of the sheath near the tip of the blade and follow the same procedure up toward the blade bolster junction for a few inches. When you near this junction it is best to let the line flow out into the stitch line above instead of making a square turn. In any case, if you pressed your cemented pieces together correctly, the leather will not part. Once you have a nice flowing line lightly marked, start at the throat of the sheath and follow this line down with your overstitch spacer tool. Drill these evenly spaced marks with the 5/64th” drill bit. Make very sure you keep the sheath perpendicular with the drill bit and level. If you drill at an angle, you will have your stitch holes come out wrong on the opposite side of the sheath. They may miss the welt to the inside or angle way out toward the outside. Make sure it is perfectly level. You are going through some thick pieces of leather at this point.
 Measure
out your thread. Make it five or six times the length of the stitch line.
Use the same opposing stitch work that you used on the belt loop. Tighten
your work with each completed stitch hole. Start at the tip and work
toward the throat of the sheath. When you reach the throat, backstitch two
holes and then take the outside thread back through the third hole like we
did on the belt loop. Cut these off short and melt them once more. Dampen
your stitch line and run the overstitch tool up the stitch line. Be
careful not to mark the surface of the leather anywhere but the stitch
line when doing this. All marks will be permanent. Trim the excess leather
off to within a quarter inch of the stitch line. You can do this with a
sharp knife or a belt sander. Be careful not to cut near the stitch line.
Use your edge bevel tool to cut the square edges off of the moistened
leather and round them with a smooth piece of wood or an edge slicker. Let
it all dry well.
Measure
out your thread. Make it five or six times the length of the stitch line.
Use the same opposing stitch work that you used on the belt loop. Tighten
your work with each completed stitch hole. Start at the tip and work
toward the throat of the sheath. When you reach the throat, backstitch two
holes and then take the outside thread back through the third hole like we
did on the belt loop. Cut these off short and melt them once more. Dampen
your stitch line and run the overstitch tool up the stitch line. Be
careful not to mark the surface of the leather anywhere but the stitch
line when doing this. All marks will be permanent. Trim the excess leather
off to within a quarter inch of the stitch line. You can do this with a
sharp knife or a belt sander. Be careful not to cut near the stitch line.
Use your edge bevel tool to cut the square edges off of the moistened
leather and round them with a smooth piece of wood or an edge slicker. Let
it all dry well.
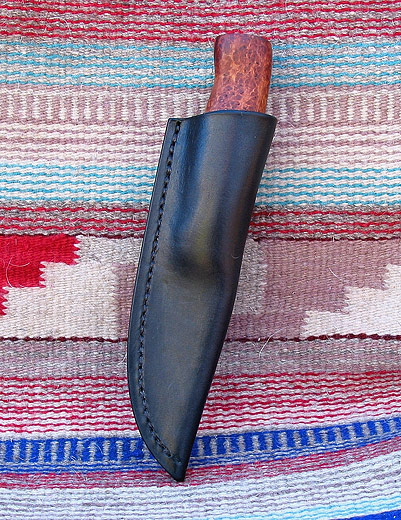
Dyeing the sheath is the final step. Black is the easiest color dye to get an even coat. It is rich and elegant looking and goes with almost anything. Fiebing makes a good dye. I have done okay with brown and tan but most of the time you will get some uneven streaking. Some people go as far as to airbrush the dye on for an even coat. First, deglaze the entire sheath with a moistened acetone rag. Let it dry and then apply your dye as evenly as possible. Practice on a test strip of leather for best results. As the dye dries polish it with a clean cloth. Do this at several intervals until it is dry. This will burnish the edges more and remove any residue which will rub off forever if you miss this step. Apply Fiebing’s Tan-Kote to the finished product in thin applications and let dry once more.
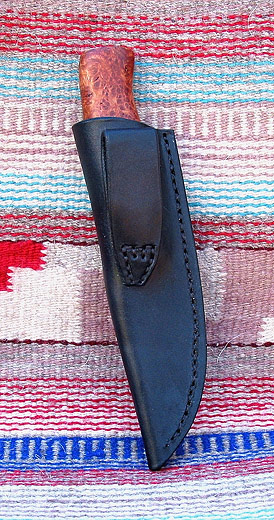
Now sheath your blade and test the fit. If it is a very good fit then head out for adventure. If it needs a little more fitting, wet down the sheath and place the knife inside. Carefully form the leather around the knife and let it dry one last time. Congratulations, you now own a sheath that fits your blade like a glove.
You can branch out and make sheaths for knives which have big guards. They have keeper straps fastened with straps. Tomahawk and hatchet sheaths are fun to design as well. The possibilities are endless. You are only bounded by your imagination. The more sheaths you make, the better they will turn out. Enjoy and take pride in your new craft.
©2003 Glen Lewis